Post
Body Temperature Sensor DS18B20
DS18B20 (digital temperature sensor) and Arduino
ABOUT THIS PROJECT
Hello, everyone! Today I'm going to show you how to use DS18B20 digital temperature sensor with Arduino, so you can measure the temperature of the air, liquids like water and the temperature of the ground.
Step 1: Information About The Sensor
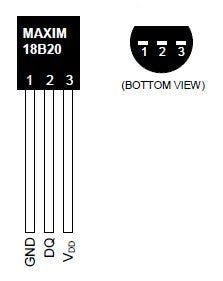
DS18B20 is 1-Wire digital temperature sensor from Maxim IC. Reports degrees in Celsius with 9 to 12-bit precision, from -55 to 125 (+/-0.5). Each sensor has a unique 64-Bit Serial number etched into it - allows for a huge number of sensors to be used on one data bus.
Features:
- Unique 1-Wire® interface requires only one port pin for communication
- Each device has a unique 64-bit serial code stored in an onboard ROM
- Multidrop capability simplifies distributed temperature sensing applications
- Requires no external components
- Can be powered from data line.
- Power supply range is 3.0V to 5.5V
- Measures temperatures from –55°C to +125°C (–67°F to +257°F)±0.5°C accuracy from –10°C to +85°C
- Thermometer resolution is user-selectable from 9 to 12 bits
- Converts temperature to 12-bit digital word in 750ms (max.)
- User-definable nonvolatile (NV) alarm settings
- Alarm search command identifies and addresses devices whose temperature is outside of programmed limits (temperature alarm condition)
- Applications include thermostatic controls, industrial systems, consumer products, thermometers, or any thermally sensitive system
Step 2: What you need:


To make the thermometer you will need the following things:
- Arduino board (UNO, DUE, Micro, etc..).
- DS18B20 sensor a waterproof or not and one 4.7k resistor*
- Breadboard
- Jumpers to connect everything together.
*Some stores sell the sensor with 4.7k resistor.
Step 3: Libraries
Before you start, download and unzip the following libraries at /Progam Files(x86)/Arduino/Libraries (default), in order to use the sensor with the Arduino board.
Step 4: Build simple circuit
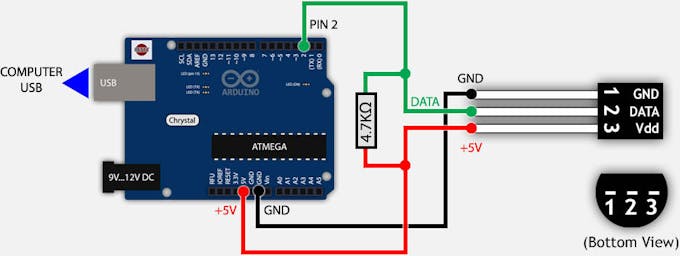

To print the data from DS18B20 on the serial monitor of the IDE you have to build the circuit by following the schematic.
First plug the sensor on the breadboard the connect its pins to the Arduino using the jumpers in the following order: pin 1 to GND; pin 2 to any digital pin (pin 2 in our case); pin 3 to +5V or +3.3V, at the end put the pull-up resistor.
Step 5: Code
/********************************************************************/ // First we include the libraries #include#include /********************************************************************/ // Data wire is plugged into pin 2 on the Arduino #define ONE_WIRE_BUS 2 /********************************************************************/ // Setup a oneWire instance to communicate with any OneWire devices // (not just Maxim/Dallas temperature ICs) OneWire oneWire(ONE_WIRE_BUS); /********************************************************************/ // Pass our oneWire reference to Dallas Temperature. DallasTemperature sensors(&oneWire); /********************************************************************/ void setup(void) { // start serial port Serial.begin(9600); Serial.println("Dallas Temperature IC Control Library Demo"); // Start up the library sensors.begin(); } void loop(void) { // call sensors.requestTemperatures() to issue a global temperature // request to all devices on the bus /********************************************************************/ Serial.print(" Requesting temperatures..."); sensors.requestTemperatures(); // Send the command to get temperature readings Serial.println("DONE"); /********************************************************************/ Serial.print("Temperature is: "); Serial.print(sensors.getTempCByIndex(0)); // Why "byIndex"? // You can have more than one DS18B20 on the same bus. // 0 refers to the first IC on the wire delay(1000); }
Download, open and upload the .ino file.
If everything is okay you should see the temperature being measured and showed in the Serial monitor at the IDE like on the screenshot above.