Post
MQ2 gas sensor hookup Guide
MQ2 gas sensor hookup Guide

Application Ideas
- Gas leakage detection.
- Toys.
Hardware Overview
This is an Analog output sensor. The examples used in this tutorial make uses of A0 analog pin. Connect this module to the A0 port of Base Shield.
It is possible to connect the Grove module to Arduino directly by using jumper wires, please refer to the connection in the table below:
| Arduino | Gas Sensor |
|---|---|
| 5V | VCC |
| GND | GND |
| NC | NC |
| Analog A0 | SIG |
The output voltage from the Gas sensor increases when the concentration of gas increases. Sensitivity can be adjusted by rotating the potentiometer. Please note that the best preheat time for the sensor is above 24 hours. For detail information about the MQ-2 sensor, please refer the data-sheet provided in Resources section.
Getting Started
What do we need
| Name | Function | Qty | |
|---|---|---|---|
| Arduino nano/UNO | Controller | 1 | |
| Grove-Gas Sensor MQ2 | Sensor | 1 |
Connection

Connect the Grove - Gas Sensor(MQ2) to A0 port as shown in the picture above.
Note: The sensor becomes very hot after a while, don't touch it!
Gas Detection : Basic Example
In this example, the sensor is connected to A0 pin. The voltage read from the sensor is displayed. This value can be used as a threshold to detect any increase/decrease in gas concentration.
void setup() {
    Serial.begin(9600);
}

void loop() {
    float sensor_volt;
    float sensorValue;

    sensorValue = analogRead(A0);
    sensor_volt = sensorValue/1024*5.0;

    Serial.print("sensor_volt = ");
    Serial.print(sensor_volt);
    Serial.println("V");
    delay(1000);
}
Measurement : Approximation
These examples demonstrate ways to know the approximate concentration of Gas. As per the data-sheet of the MQx sensors, these equations are tested for standard conditions and are not calibrated. It may vary based on change in temperature or humidity.
- Keep the Gas Sensor in clean air environment. Upload the program below.
void setup() {
    Serial.begin(9600);
}

void loop() {
    float sensor_volt;
    float RS_air; //  Get the value of RS via in a clear air
    float R0;  // Get the value of R0 via in H2
    float sensorValue;

    /*--- Get a average data by testing 100 times ---*/
    for(int x = 0 ; x
-
Then, open the serial monitor of Arduino IDE. Write down the value of R0 and this will be used in the next program. Please write down the R0 after the reading stabilizes.
Replace the R0 below with value of R0 tested above . Expose the sensor to any one of the gas listed above.
void setup() {
    Serial.begin(9600);
}

void loop() {

    float sensor_volt;
    float RS_gas; // Get value of RS in a GAS
    float ratio; // Get ratio RS_GAS/RS_air
    int sensorValue = analogRead(A0);
    sensor_volt=(float)sensorValue/1024*5.0;
    RS_gas = (5.0-sensor_volt)/sensor_volt; // omit *RL

          /*-Replace the name "R0" with the value of R0 in the demo of First Test -*/
    ratio = RS_gas/R0;  // ratio = RS/R0
          /*-----------------------------------------------------------------------*/

    Serial.print("sensor_volt = ");
    Serial.println(sensor_volt);
    Serial.print("RS_ratio = ");
    Serial.println(RS_gas);
    Serial.print("Rs/R0 = ");
    Serial.println(ratio);

    Serial.print("\n\n");

    delay(1000);

}
Now, we can get the concentration of gas from the figure below.
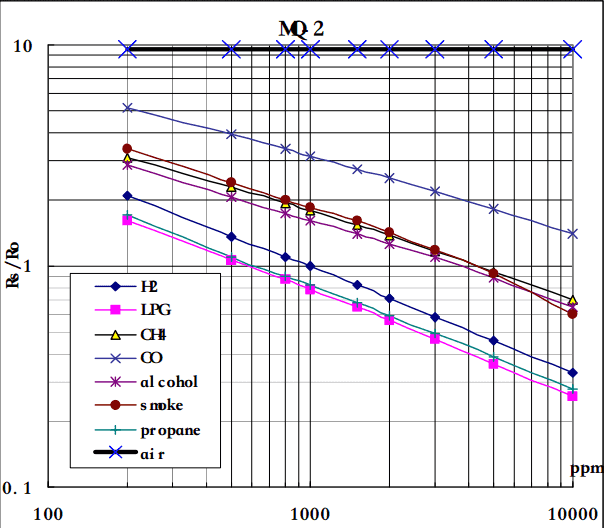
According to the graph, we can see that the minimum concentration we can test is 100ppm and the maximum is 10000ppm, in a other word, we can get a concentration of gas between 0.01% and 1%. However, we can’t provide a formula because the relation between ratio and concentration is nonlinear.